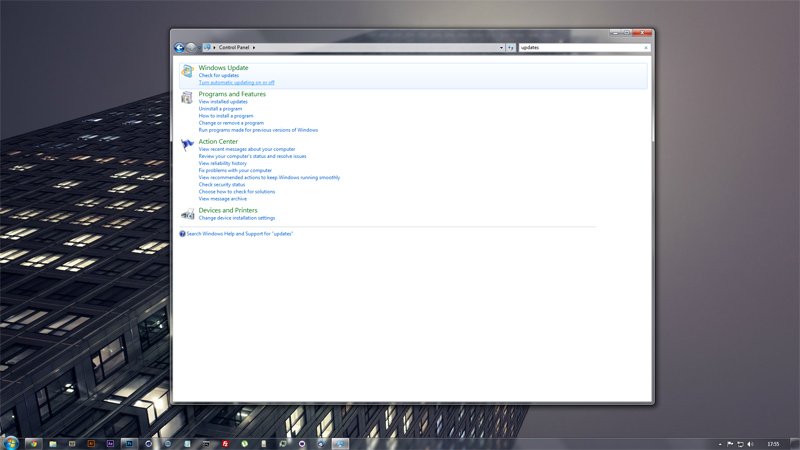
Computer Systems – Assignment 3
Hardware and the OS [P5] [P6]
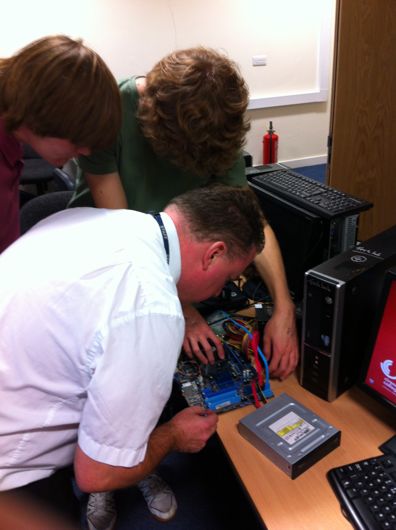
Building the PC
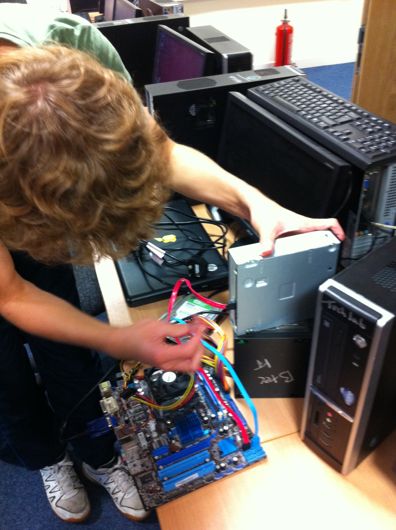
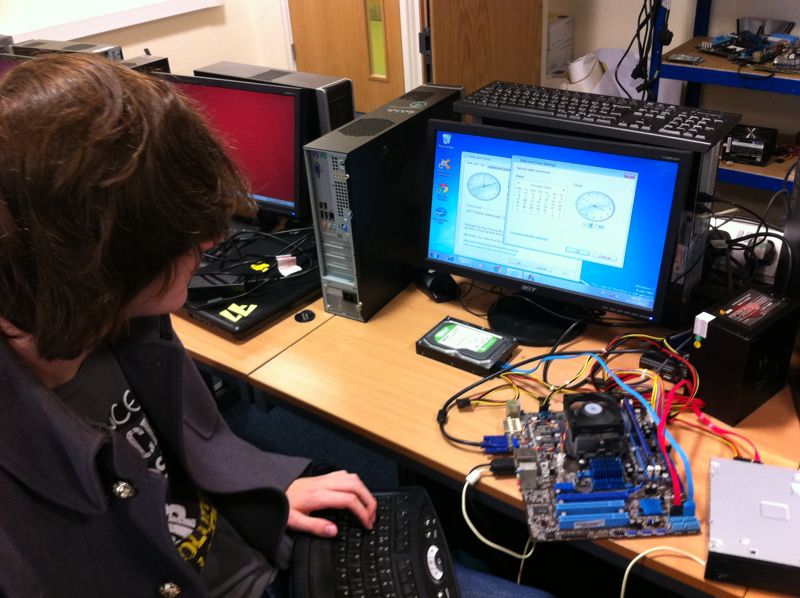
We built the PC using an Asus Micro-ATX motherboard, AMD CPU and Kingston HyperX DDR3 RAM. The steps we took are detailed below with images illustrating the process. More about the different components of a computer system can be found in the Assignment 1 documentation.
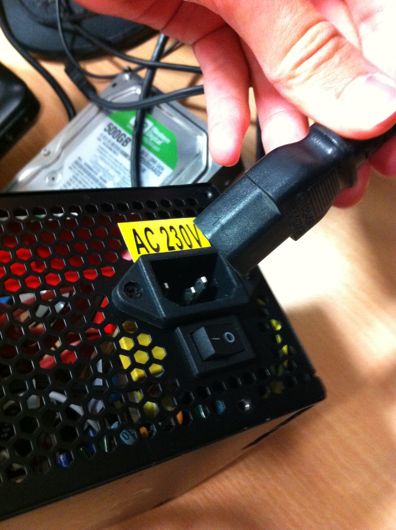
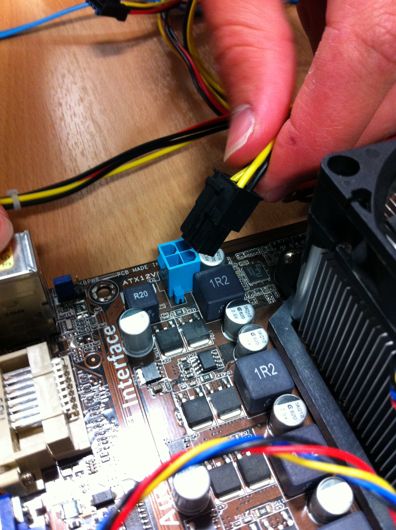 The left image shows the insertion of the power cable into the power supply. The switch is set to the off position for safety purposes. On the right the 12V ATX supplemental power supply connector can be seen being inserted into the socket on the motherboard. This provides extra power to the motherboard not supplied by the main 24-pin supply.
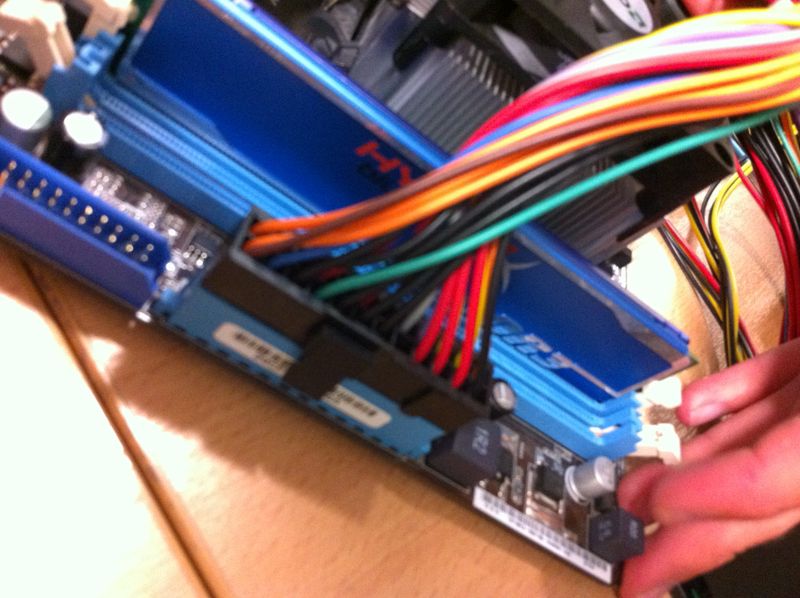 The main delivery of power to the motherboard, using the ATX 24-pin power conenctor. The four right-most pins in this image can be detached from the connector for lower power motherboards that only require a 20-pin connection.This power cable and the supplemental 12V power shown above indirectly power the CPU, chipset, motherboard components, PCI slots and other peripheral ports. The RAM is shown behind, the addition of which is shown below.
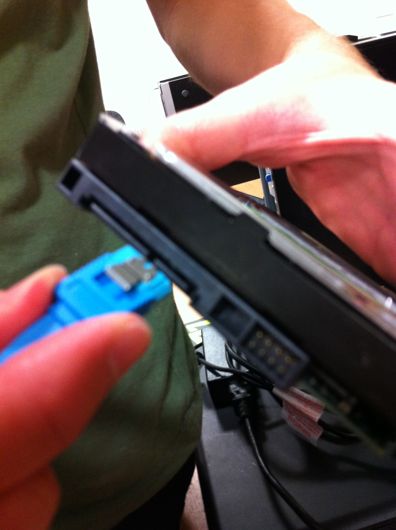
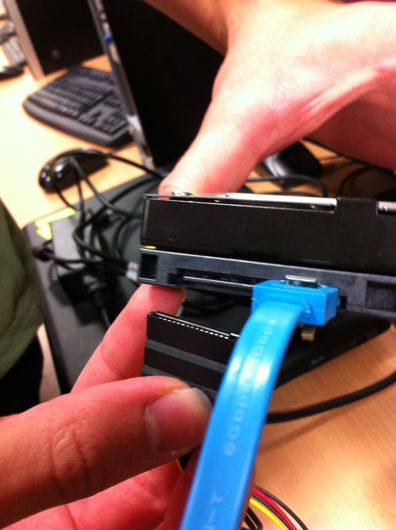 The insertion of SATA data and SATA power connectors (left to right) into a hard-disc drive. The particular model in our case was a Western Digital WD Green 500GB.
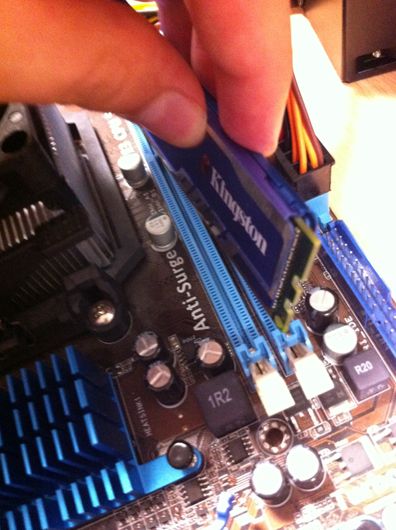
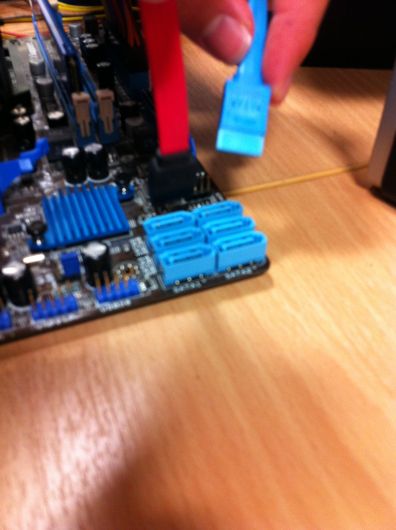 The left shows the addition of RAM to the system, by way of being placed into one of the two DIMM slots on the motherboard. On the right, SATA data connectors can be seen above the six SATA headers on the motherboard. Only the data connector appears on the motherboard, as SATA power for drives originates from the power supply.
 RAM being pushed downwards into the motherboard. In order to do so, the clips either side must be opened, which will flick back and hold the RAM module in when one is inserted. The force required to make this clips function can alarm some, but motherboards are designed to take the strain.
 Starting the computer by creating a connection between the power+ and power- F-PANEL header pins. This header area of the motherboard is intended to accommodate the connectors provided by a computer case front panel, which almost always has a power button. As we were not using a case, we had to manually complete the circuit that the power button usually would. The F-PANEL header also houses pins that carry hard-drive activity data (usually to an LED on the case) as well as reset switch pins. We also checked the power and data connections for the optical and hard-disc drives.
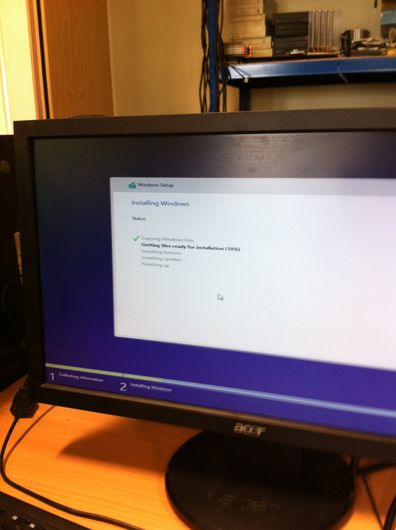
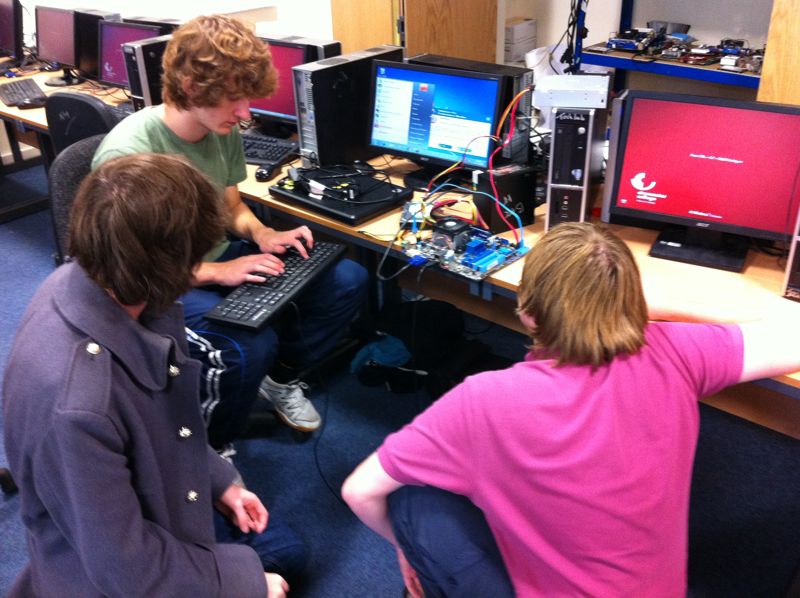 The computer successfully booted, using the installation of Windows 7 already on the drive. We later formatted the disc and installed the Windows 10 Technical Preview. We used a USB mouse and keyboard to control the computer.
 The computer progressed easily to the desktop and we started to partially configure the pre-installed OS. Having had issues with the keyboard we were using initially, we used a different model and connected to a different USB port.
 Changing the time after clicking the clock in the bottom-right of the screen, and then "Change date and time settings...". We used another computer and the website time.is, which provides an accurate, updating clock. We entered a time ~15 seconds ahead of reality, and clicked OK when the actual time caught up, leaving the computer's clock accurate within at most a fifth of a second.

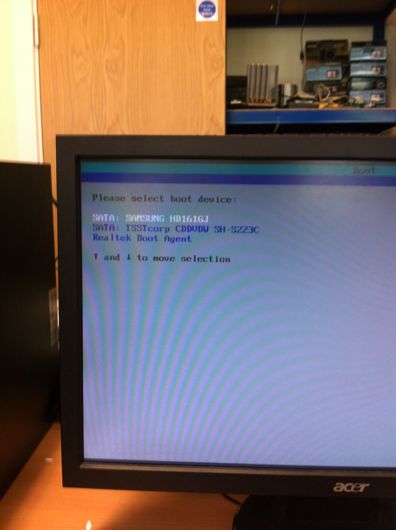 Using anti-static wrist-bands helps to ensure that static electricity generated by working does not damage the components being handled. Inside the band is a small metal plate that touches the wearers skin, and this connects to a wire with a connector on the end. This can be attached to a standard crocodile-clip and then attached to a large, bare metal object or ground lead. The image to the right shows the selection of a specific boot drive when installing an operating system from a DVD.
Installing the OS; Windows 10 Technical Preview
The hard-drive we used for the build had already be used to run Windows 7, but we decided to move forward to Windows 10 Technical Preview. Although still in the development stage, the preview allowed us to benefit from new performance improvements and better hardware support. The installed the OS by booting the machine from a disc with the Windows 10 ISO disc image burned onto it.
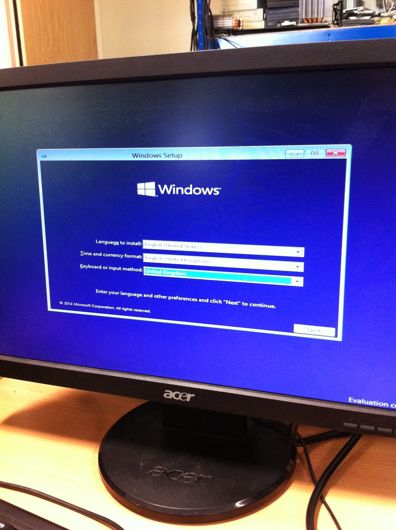
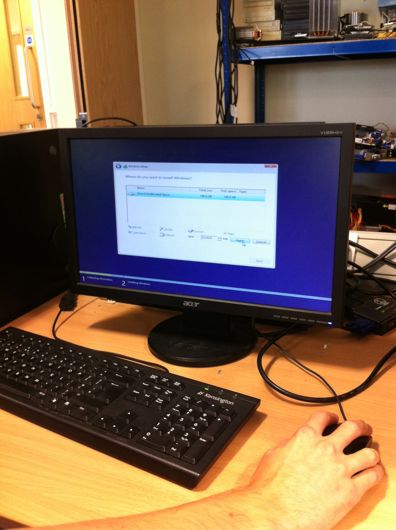 Selecting the correct language and keyboard preference, and then partitioning the hard drive during the installation of Windows. We deleted the two Windows 7 partitions on the drive already, and created a single, new NTFS-formatted partition for the new installation. Upon continuing with the installation Windows added another partition before ours, filling about 300 MB. This partition is used by Windows for particularly important system files.
 The left shows Windows being installed. The vast majority of this process is merely copying and extracting files from their compressed format on the installation disc to the actual HDD in the computer. Once this was complete, the system automatically rebooted and launched the Windows 10 setup. Here we configured various options to improve privacy for the end user. This related mostly to advertising and data collection.
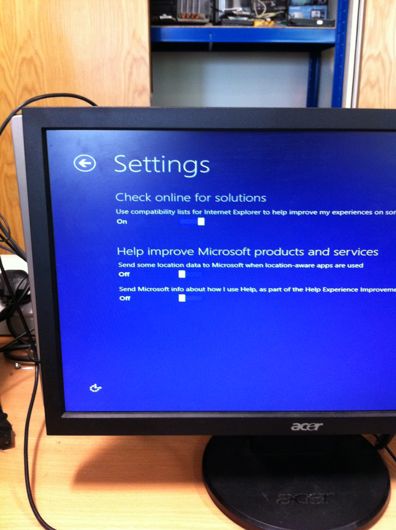
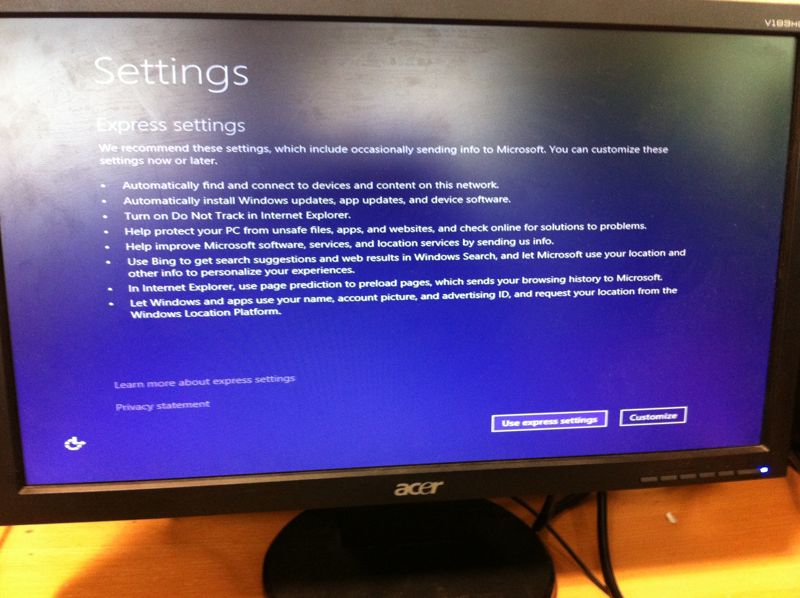 Upon being prompted to, we chose to customise the setting that would decide what data was sent to Microsoft. We chose to opt-out of as much as we could, as the computer was not going to see consistent use. This would mean that any data sent would be anomalous and would affect the accuracy of true usage statistics that Microsoft intends to collect.
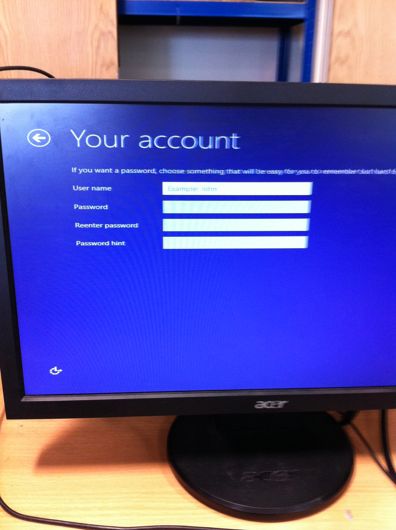
 The next step of the installation involved creating a user profile. We used "password" for the password so as not to prevent others from using the installation in the future, and set a password hint saying this. In reality, it is best to use a password of eight characters or longer, and include symbols, punctuation, numbers and both upper- and lowercase text. In reality, the files on the drive are not encrypted by default, and could very easily be extracted using a Linux distribution on a USB stick and the motherboards boot menu.
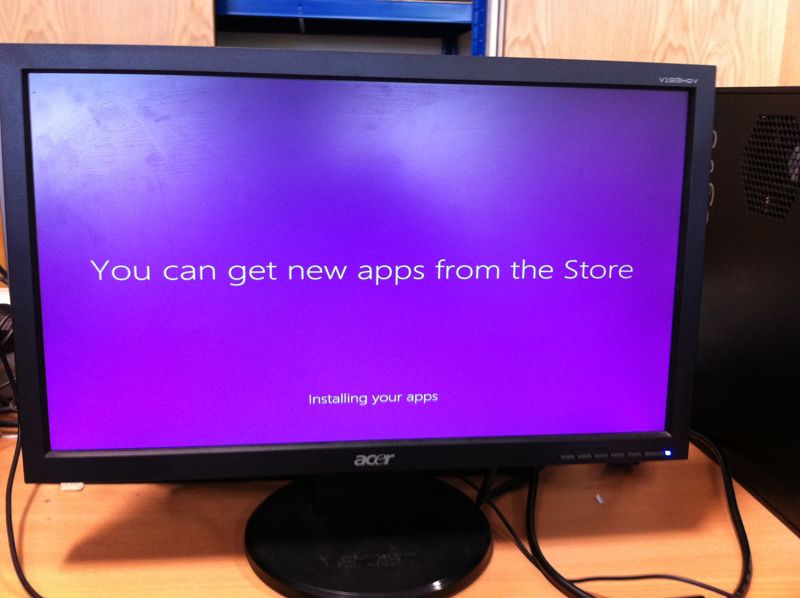 Part of the installation involved Windows installing some basic apps from the Windows Store introduced with Windows 8. As the computer was not connected to the internet, this likely just involved installing packages already stored in a compressed format on the installation disc.
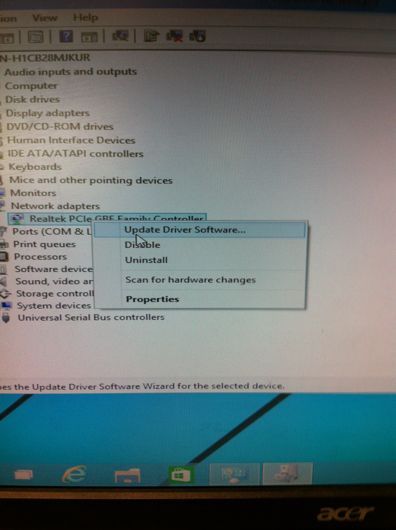
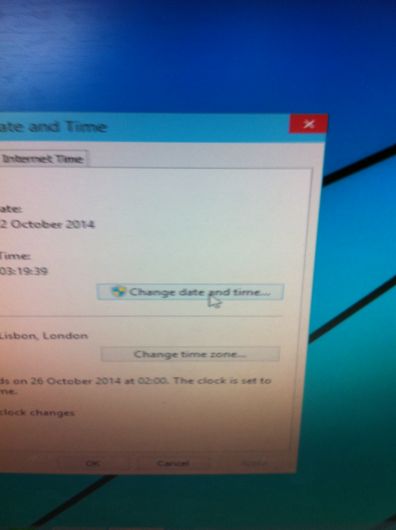 Unsure if the correct drivers were being used for each hardware component and that newer versions weren't available in the OS that were not already in use, we opened the Device Manager. Had we been able to connect to the internet, this utility would have queried the Microsoft driver database for newer versions, and updated any affected drivers, but in our case it merely searched the driver library Windows includes for suitable software. The Device Manager in Windows can be most easily accessed by opening the start menu and typing "device". We also opened the date and time settings window in order to check that the system time was accurate.
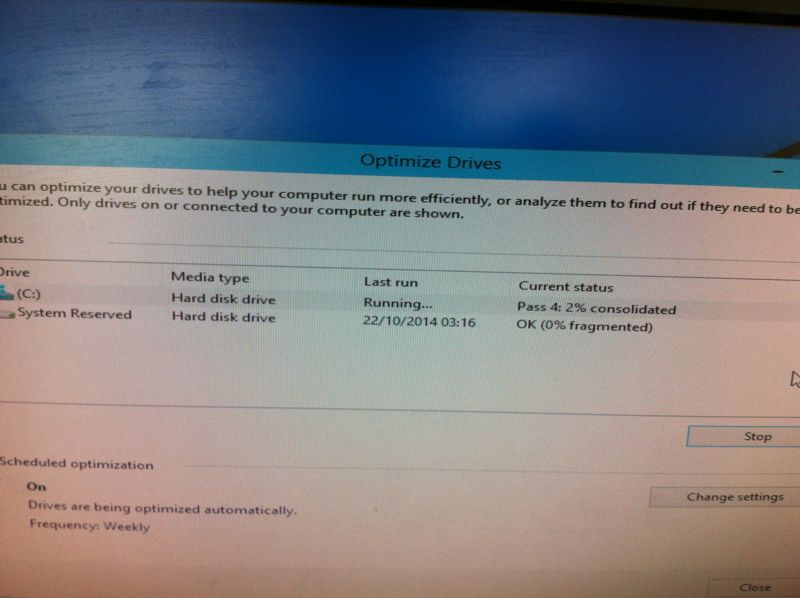 Although the operating system had only just been installed and the drive formatted prior to that, we decided to run a disc defragmentation on the main drive. The drive was found to be less than 5% fragmented, as expected, but we ran the algorithm nevertheless to ensure the computer performed as well as it could.
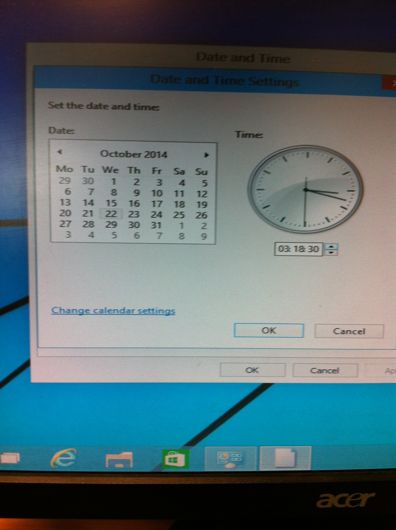
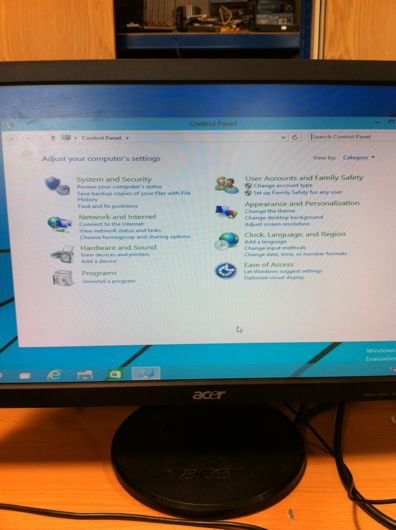
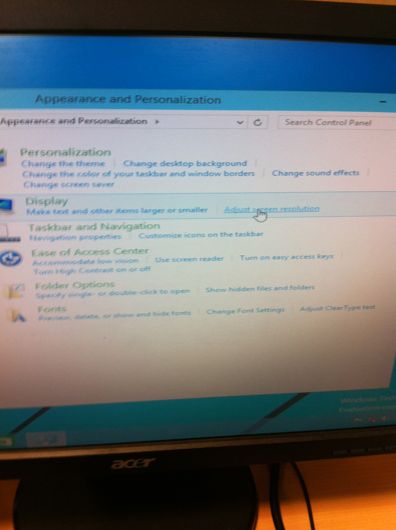 Time on the machine also needed to be adjusted, a involving a process we had performed on the older Windows 7 installation. Using the web once more to find an accurate and updating clock, we adjusted the time by typing a value several seconds ahead of time and submitting the value once the actual time matched it. We also opened the control panel to change to the desktop resolution, also accessible by right-clicking the desktop and then clicking "Screen resolution".
 Presumably due to the lack of an internet connection, the drivers for the on-board video chip were not installed, and were not pre-packaged with Windows. For this reason, we were not able to select any screen resolution other than 1024 × 768, which caused a stretch of content horizontally when displayed on the monitor we were using.
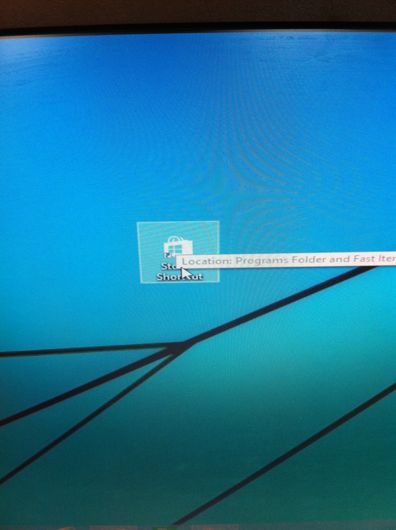
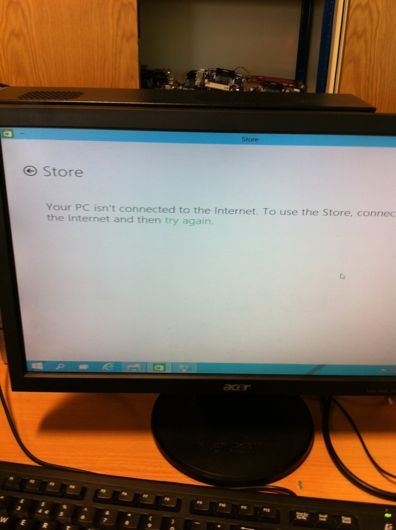 Because the start menu shortcuts can be slow to access, and the taskbar can become crowded when adding several shortcuts, we added a desktop shortcut for the Windows Store, allowing a user to install new software with ease. Due to the lack of an internet connection, we were not able to load any content.
 The "Devices and Printers" window in Windows. This is where one would go in order to install a printer (using either the Add a device or Add a printer button above the icons) not automatically installed when plugged in. This also allows one to access the properties of devices attached to the system, which in turn allows a myriad of settings to be changed, such as the functionality of buttons on a mouse, macros on a keyboard and default printing options.
 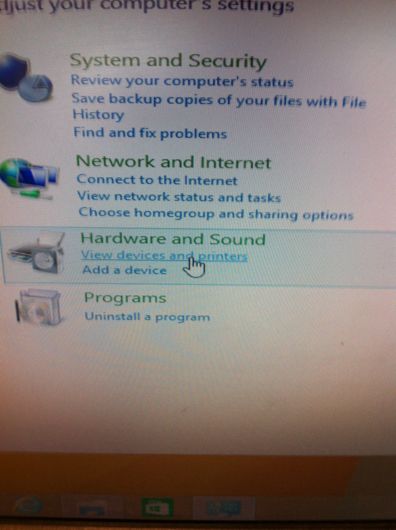 This link found in Control Panel is one way to access settings for printers and other peripherals. This can also be accessed by searching in the start menu, for example.
Guide: Changing the Font Size in Windows
 1. Open the start menu and click Control Panel.
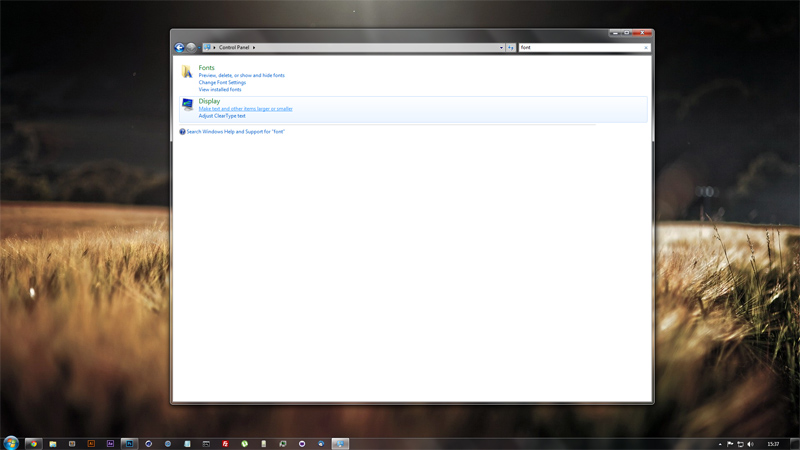 2. Type "font" into the search box in the top right of the window that appears, and then click Make text and other items larger or smaller.
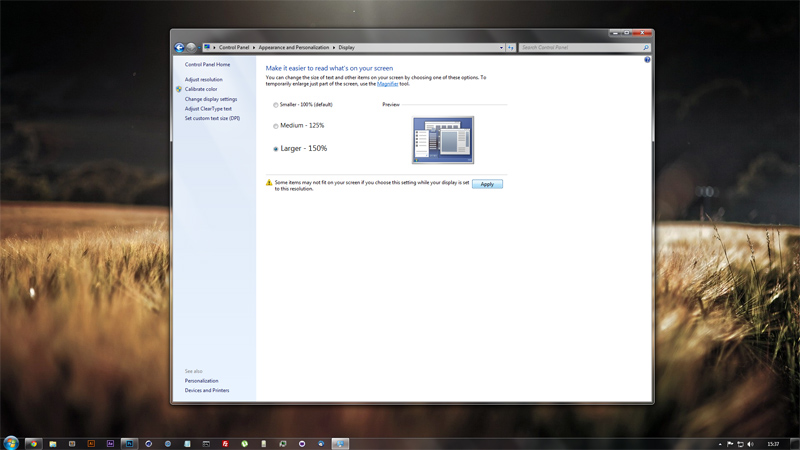 3. Select one of the three options presented using the radio button to their left. Click Apply when you're content with your selection.
 4. Windows will present a Window asking you to log out and back in again. In order to do this safely, save any documents open in any applications you have open, and close those applications, then click Log off now.
 5. Log back in again, and you should notice your mouse cursor, desktop items, taskbar icons, window borders and text have all grown. In order to reverse the process, follow the steps again but pick the default 100% text size during step 3.
Testing the System [P7]
| Test | Expected Outcome | Actual Outcome | Further Action |
|---|---|---|---|
| Are the time and date both correctly configured? | Yes, and time.is reports the clock as exact. | As expected | None required |
| Are paper sizes set up correctly for printing? | The standard pront window to show in Notepad when using the print option in the File menu or pressing Ctrl + P on the keyboard. | As expected | None required |
| Do all the desktop shortcuts work? | Yes, as Windows implements complex and efficient file tracking once shortcuts have been created. This means that a file may move, and any shortcuts on the system will be updated, even without the current user having write permissions. A shortcut will break if the file it points to is deleted, however, and if it has an alert will be shown asking if the user would like to remove the shortcut if the user clicks it. | As expected | None required |
| Are all the necessary hardware drivers installed? | Functional drivers have been installed, meaning that Windows does not show any errors in the Device Manager. The only drivers available, however, can have been those on the Windows installation disc, as the installation computer was not connected to the internet when we installed the OS. Official or more up-to-date drivers may be available on the AMD, Intel or Nvidia websites than those that were on the computer. | We were fairly certain that the drivers installed were either marginally out of date or not official software, so we decided to rectify this. | Using the device manager to find the model of the video chip, we looked for the Intel support and download pages online on another computer. We entered the model number and downloaded the supplied executable installer. We placed the file on a removable USB stick, and then moved it to the Windows 10 PC's downloads directory. From here we ran the installer, and then rebooted the machine to ensure the new drivers had been installed. |
| Does the CPU and/or GPU exceed acceptable temperatures when under load (using Prime95 and SpeedFan)? | I would imagine that the CPU would reach high temperatures (around 80°C) as the CPU heatsink likely hadn't be reseated with new thermal paste in several years. | In testing, the temperature reached a maximum of 84°C, after 10 minutes of full load operation. We did not test with a graphical benchmarking application as we had not installed a dedicated video card, and the onboard graphics would undoubtedly be low-performance and likely not include a temperature sensor. | In order to improve the temperature of the CPU under load, the CPU heatsink would likely need to be reseated. This would involve undoing the four screws around the CPU socket; carefully removing the backplate behind the motherboard; removing the heatsink from the CPU by gently twisting; cleaning the copper plate and CPU with strong isopropyl alcohol and tissues; drying the components and applying new thermal paste in the centre of the CPU (about a pea-sized amount); evenly lowering the heatsink over the CPU once more; then finally fastening the heatsink screws to the backplate in an X pattern to ensure an even distribution of paste across the CPU. |
| Were the deafult directories created in the user's home directory upon install? | Yes. We expected a number of folders, including Documents, Downloads and Pictures, as well as the four standard Windows libraries (Documents, Pictures, Music, Videos) | As expected | None required |
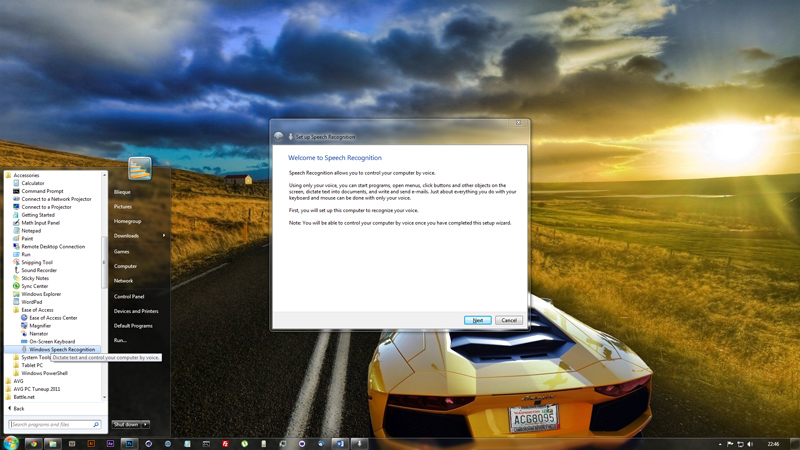
| Is voice recognition available in the Start menu? | Yes, as this is a core Windows component, and the installation would likely have thrown errors if any such component failed to install. | As expected | None required |
Evidence
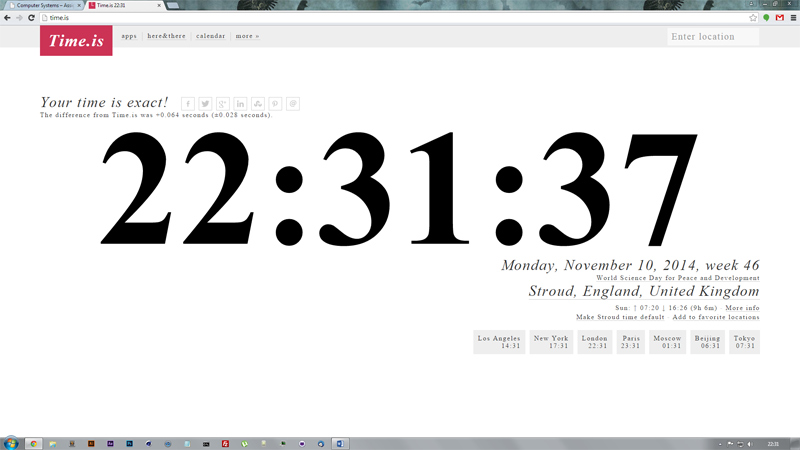 A screenshot of time.is, showing the system clock to be within 64 milliseconds of real time.
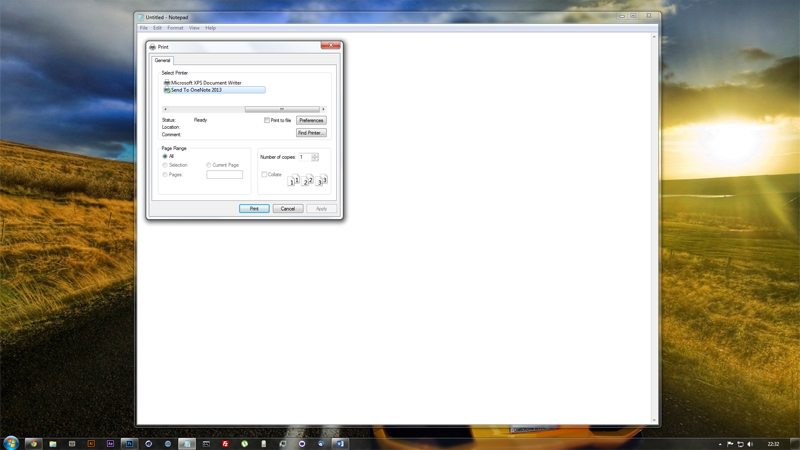 A screenshot of Notepad's print window, showing that the standard print diaogue window shows, with expected options.
 The default directories all showing in a user profile.
 Speech recognition successfully launched from the start menu.
Routine Maintenance [P8]
Guide: Defragmentation
Windows includes a defragmentation program by default, which can be used to defragment any filesystem that Windows is able to read and write to. This excludes, for example, ext4 filesystems, but these do not require defragmentation in order to maintain optimal performance. The steps below outline the process of using the default Windows defragmenter to improve drive read/write speeds.
 1. Open the start menu and click Control Panel.
 2. Type "defr" into the search box in the top right of the window that appears, and then click Defragment your hard drive.
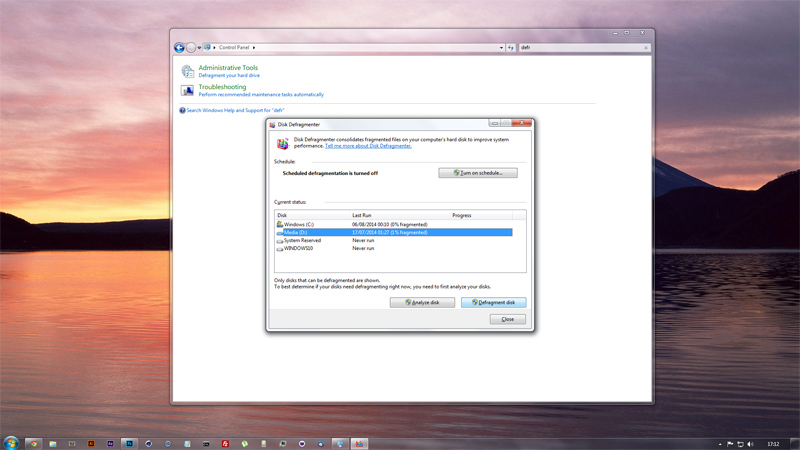 3. The Windows Disk Defragmenter will appear. From the list, select a hard-disc drive (as opposed to an SSD, which should never be defragmented), and then click Analyse disk in order to update the fragmentation percentage to better judge whether or not to defragment the drive or click Defragment drive to immediately begin defragmentation.
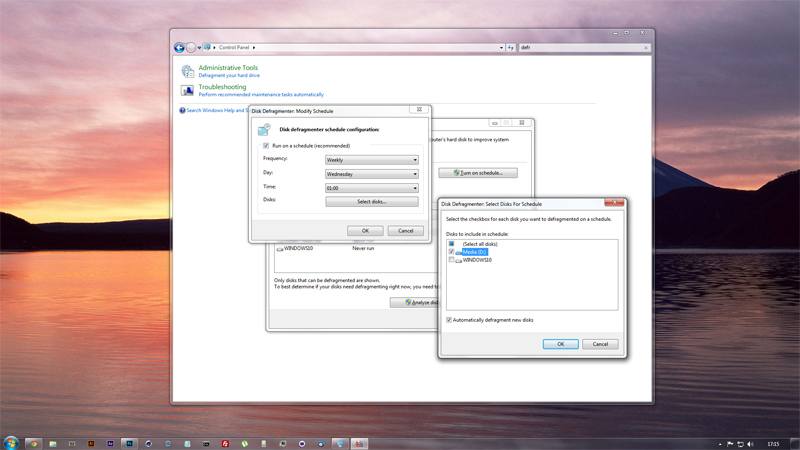 4. One can also click Turn on schedule... in the top right, which allows you to configure a regular defrag time and which drives should be included in this process.
Guide: Removal of Temporary Files
As an operating system is used temporary files are frequently created. These allow images on the web, for example, to be cached, meaning they don't need to be downloaded whenever they're required by a webpage. Image caching is designed to improve the speed at which web pages load and reduce the data consumption of browsing.
Although caching has a positive impact on browsing speed, it can have a negative impact on general computer performance. The files downloaded fill space on the hard-drive, which can lead to more severe fragmentation. In order to improve the speed of a computer overall, these temporary files can be deleted without relying on the browser that created them to do so. Valuable disc space can also be freed, allowing more user files to be stored and programs installed.
In order to easily remove files that the system has created over time, follow the steps below.
 1. Open the start menu and click Control Panel.
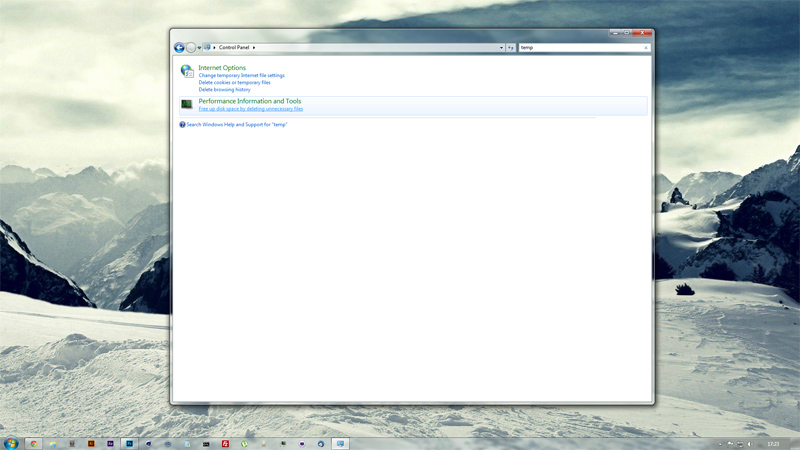 2. Type "temp" into the search box in the top right of the window that appears, and then click Free up disk space by deleting unnecessary files.
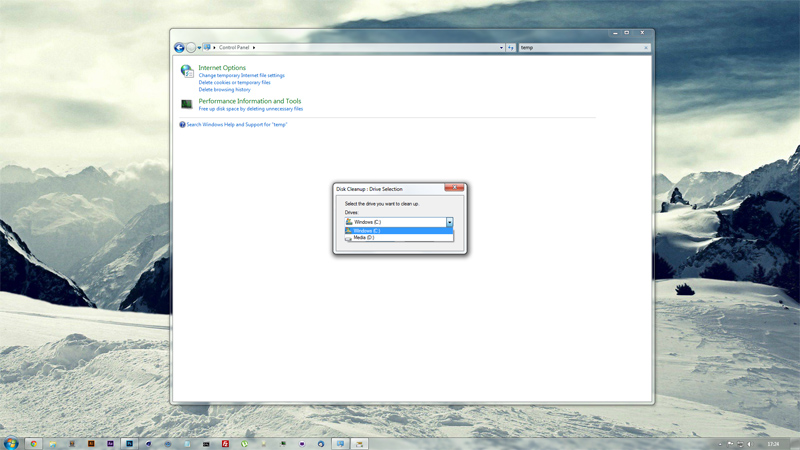 3. Pick a drive available to the system that you would like to remove temporary files from. In the majority of systems, this will just be the `C:\` drive.
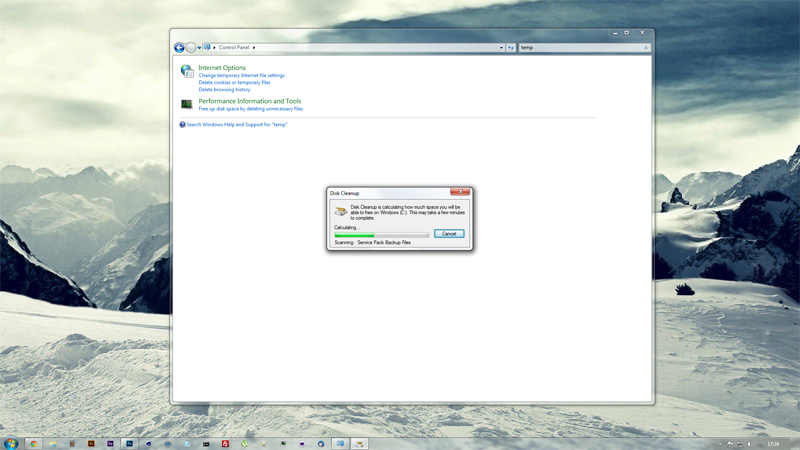 4. Click OK and the system will begin to scan for files on the selected drive that are no longer needed.
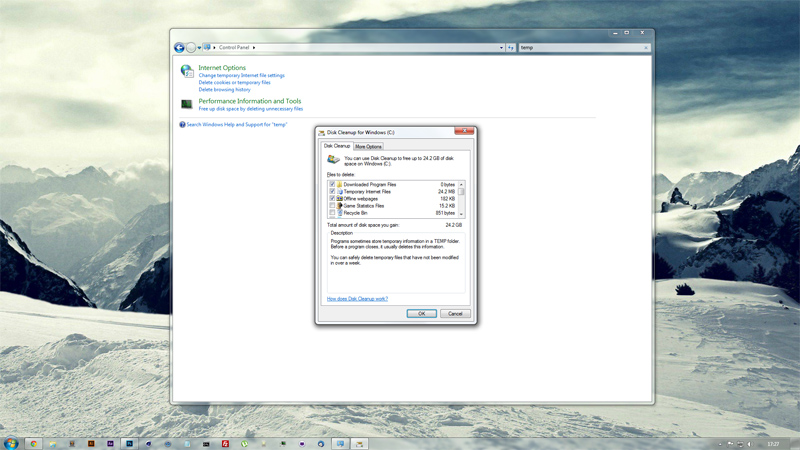 5. Next a window will ask you which types of files should be removed. If you wish not to lose game statistics for any pre-installed Microsoft games, this option can be un-ticked neat the top of the list.
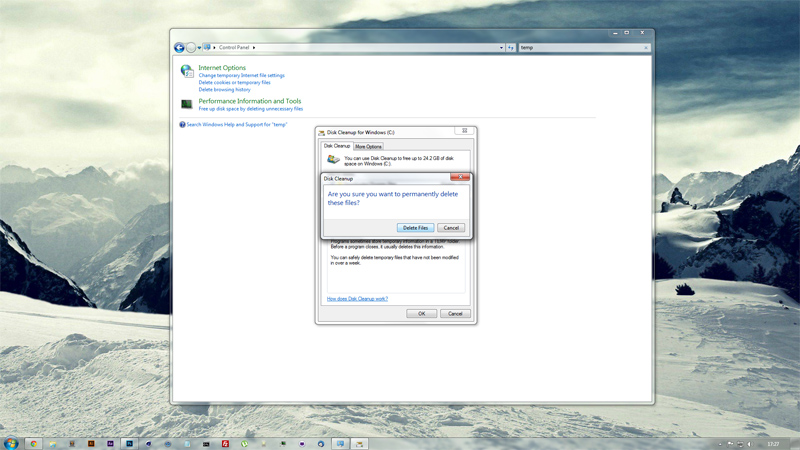 6. Click OK and then Delete files to begin the actual deletion process. This may take several minutes, but you should notice more free space on the drive selected once the process has completed.
Guide: Enable Automatic Updates
Updates are frequently released for Windows by Microsoft in order to protect the data and identity of the operating system's users, as well as to provide performance improvements. Updating can be made automatic by changing some setting in the Control Panel, as shown below.
 1. Open the start menu and click Control Panel.
 2. Type "update" into the search box in the top right of the window that appears, and then click Turn automatic updating on or off.
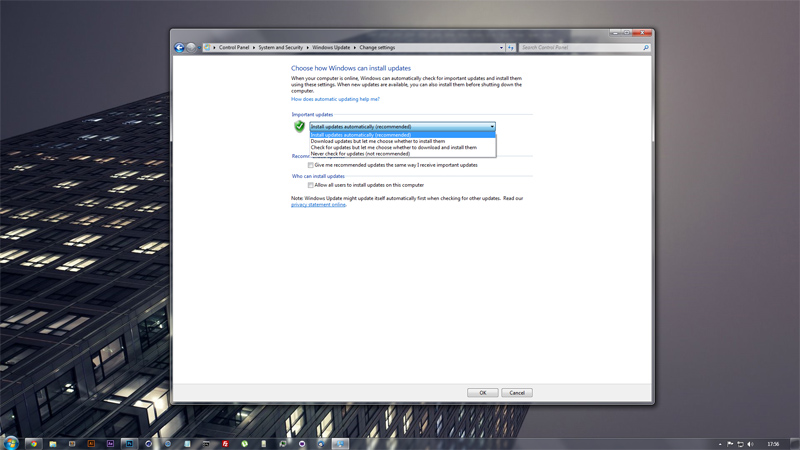 3. Use the drop-down menu under Important updates to change the way in which the system installs updates that provide security improvements or significant changes to the performance and stability of Windows.
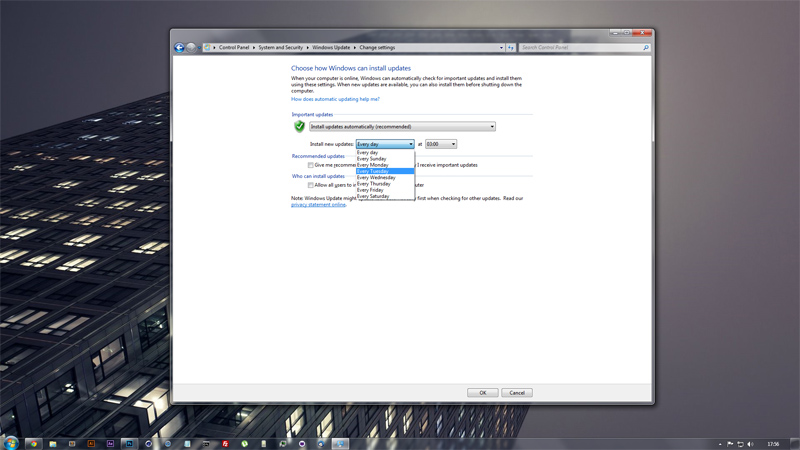 4. You may also change the automatic update schedule using the drop-down menus below. For example, Windows can be configured to check for and install any new updates every Tuesday at 3:00 PM, or any other time that might be more convenient for you.
Evaluation of the System [M3]
Despite having high-end hardware components and professional grade software, a system may still fail to achieve the purpose it was needed for. For example, a user that suffers from arthritis may find it difficult to use the computer at a typical computer desk, and may find a more flexible form of computer, such as laptop or tablet, more appropriate. Below, the system we built is analysed in terms of being fit for purpose, both from hardware and software points of view.
Hardware Specifications
The system we build using hardware components had low-end to medium-range parts. A list is shown below:
| Category | Model |
|---|---|
| Motherboard | Asus M5A78L-M LX PLUS |
| CPU | AMD Athlon X2 340 |
| Memory (RAM) | 2GB DDR3 Kingston HyperX Blu |
| Video Card | AMD 760G integrated |
| HDD Storage | 500 GB Western Digital WD Green |
| Power Supply | Generic 400 Watt |
| Optical Drive | Samsung CD/DVD Reader/Writer |
These hardware specifications aren't top-of-the-range by any means, but they do still offer potential as an effective personal computer. In reality, one could make the most of a system like this by installing a less demanding operating system than Windows on the machine, such as Linux. Particular distributions of Linux are even targeted specifically towards lower-end, perhaps dated hardware, such as Lubuntu, which achieves good performance by minimising the number of background processes and using a light-weight set of software packages by default.
The hardware components mean that a user could read and write data from and to optical discs, which may be useful as a graphic designer when creating presentations to showcase work to a client. It also provides enough electrical power to expand in the future; should the user(s) decide to add a dedicated video card to the system, they would be able to do so easily, without drawing more power from the PSU than it is rated for.
OS Configuration and Suitability
Screen Resolution
We configured the screen resolution as high as the system would allow. The most important part of setting a screen resolution is that the ratio of width to height of the graphics output matches that of the monitor, even if the pixel count is different. This ensures that the items on screen will not become distorted (e.g., a circle becoming an oval). As the primary use of the system would be graphic design, the screen resolution would be essential in practise, and would need to be correct. I am confident that with an internet connection, the correct drivers for the graphics chip in the AMD 760G chipset could have been installed, which would have enabled full resolution and possibly even HD output, given a compatible monitor.
As the computer would be in use by a person with poor eyesight, I would consider the use of the correct screen resolution imperative as well. Already being hard of sight, the second user of the system could easily become confused with distorted and blurred information. Using the largest output dimensions supported by the monitor would allow the user to see items on screen as clearly as possible, and would make increasing the font size more effective.
In terms of screen resolution, I believe the system would meet the requirements of the user, once correct drivers were installed.
Mouse
The mouse settings were left as the defaults packaged with Windows, although many users find this to be slow. A graphic designer may need a slower mouse cursor for making more precise movements when completing design work, leading us to leave the settings as they were. The need for a slow cursor sensitivity could be negated by using a mouse with a high-precision laser sensor, which would allow for much finer control at a single-pixel level.
The mouse sensitivity would also be more suitable for the user with worse eyesight. The cursor may be easier to track for the user as it would move slower around the screen, and this would make clicking within small areas less of a hassle. Having noticed that the vast majority of the content typically viewed on computers, and therefore behind the mouse cursor, was white or at least light-coloured, we decided to change the colour of the mouse cursor to black, improving contrast between the cursor and the content on screen. This can be done by navigating to the Control Panel, and searching for "mouse". In the mouse settings dialogue box, there is an option to change the mouse cursor used by Windows. As cursor settings are user-specific it would make sense to add users for each real user of the system, meaning they can each change the settings to what works best for them.
In terms of mouse sensitivity and cursor appearance, I believe the system would meet the requirements of the user(s).
Font Sizes
In order that the text on screen and other graphical features such as buttons would be easily visible and clear to the user with poor eyesight, the text size on the system was changed. This can be done by following the steps in the guide at the end of the P6 task. This makes the Windows UI a lot easier to read for many, and is user-specific like the mouse cursors mentioned above. This means that with separate user accounts, the different people using the computer could configure their own settings to best suit their preference.
In terms of text appearance, I believe the system would meet the requirements of the user(s).
User Requirements Overall
Honestly, I don't believe that the PC could have met the requirements of the user in practical use. Although the screen resolution; mouse sensitivity and appearance; and text settings could all be altered to best suit the users, the hardware in the system was simply too low-end. Using Linux and light-weight alternatives to the industry standard software packages such as Adobe Illustrator CC and Adobe Photoshop could yield good results, but I feel that the user would only spend more time trying to make the software behave as needed, and not be able to freely create.
To conclude, I would suggest that the designer instead spend more money and buy a more feature complete and powerful machine, such as one incorporating an Intel i7 CPU; AMD Radeon R9 280 or Nvidia GTX 900 series graphics card (or better); between 8 and 16 GB of RAM; and a more capable, reliable motherboard. This hardware would be able to run all of the necessary software and Windows without any problem, and possibly even run Mac OS X to an extent, which is regarded by many to be the standard in design.
Potential Performance Improvements [D2]
There are a number of ways in which the performance and usefulness of a computer system can be improved. By changing configuration in both terms of software and hardware, the power and effectiveness of a computer can be completely changed. For example, by removing software that needn't be running, the amount of processes using CPU cycles on the processor is reduced, and the performance of the computer benefits from this. Also, by adding a more powerful dedicated video card to a system, the performance noticed in games and hardware-accelerated applications can be vastly improved.
Below, more ways of improving system performance and usefulness are detailed:
Suitability by Software Configuration
A computer can be made more suitable for its users by changing both software and hardware configuration. As an example, we will use the dyslexic user from the previous task, who also suffers from arthritis and poor eyesight.
In order to make the system as easy to use as possible, the font sizes used by the GUI (graphic user interface) can be increased. This means that the user will be able to read the text on screen with much greater ease, and may not require the use of uncomfortable glasses.
In a hardware sense, the computer could be positioned in a number of different ways. The user may find that the discomfort brought by their arthritis isn't as bad when standing, and a standing desk could be used as a result. If they found that lying on a bed or sofa was more comfortable, they could use a computer mounting solution built to enable this.
In order to make the process of entering text both easier and quicker, the user could also set up a form of voice recognition to command the computer and dictate information. A voice recognition program is built into Windows, which can be calibrated to a particular user's voice and be used to perform typical computing tasks without the use of keyboard or mouse.
The screen resolution would likely best be set to the resolution of the actual monitor being used, as is usual. That said, if the increase in font size provided by changing settings in the Windows Control Panel does not make the test physically big enough, the screen resolution can also be changed. By using a lower resolution output, the items on screen will likely be larger as most monitors will scale the input given to them in order to fill the entire display.
Performance by Hardware Configuration
Although it can be expensive to fund, the best and most effective way to improve the performance of a computer system is by upgrading the hardware components. The most likely to improve performance with an upgrade are the processor (also called the CPU), memory (also known as RAM), storage device (switching from hard-disc to solid state drives) and the video chip or card. Below is a list of these components, the way in which each would improve the performance of a computer, and the potential cost of new parts.
Processor
The processor is the main component of any computer system, often described as the brain of a PC. The processor typically includes an arithmetic logic unit (ALU) and graphical processing unit (GPU) (processors with stronger-than-typical graphical units are marketed as APUs by AMD). This is situated in the socket on the motherboard, and is typically covered by the heatsink used too cool it during operation. In recent years, both AMD and Intel have been seen to be improving the graphical units built into their processors, meaning that the need for on-board graphics in the chipset (part of the motherboard) and even a dedicated graphics solution in a computer are not nearly as essential as they once were.
A faster processor (one clocked at a higher frequency, measured in GHz) is able to cycle a greater number of times each second, meaning that more calculations can be performed in a given amount of time. Higher-end processors also feature multiple cores, which can run in parallel, also improving the performance of the system. A more expensive processor will typically include a higher clock speed, more cores and better integrated graphics. These all improve the performance of the computer overall, by allowing programs to execute quicker, simultaneously and with hardware acceleration (the use of a graphical processing unit, such as a video card or APU). For these reasons I would recommend a better CPU to the graphic designer, such as an Intel i7-4790, as well as an companying Z97 motherboard.
Memory
By increasing the amount of memory available to the system, by physically installing more RAM modules into the motherboard, the performance a system can benefit, particularly when multitasking with a number of different applications or when editing video footage and images in bulk, both of which a graphic designer may well do. RAM was one one of the most expensive components of a system, but a desktop-size (DIMM form factor) memory kit with a capacity of 4GB and running at DDR3 frequencies would only cost around £30, even from a reputable brand. RAM is also one of the easiest upgrades to make to a computer, unlike changing the CPU, and very few computers use all of the RAM slots on the motherboard. Most standard and workstation motherboards have four or even eight slots, meaning that it's unlikely for there not to be room for more.
RAM is used by the operating system to store information temporarily, and is volatile. This means that without power, the information on the RAM is lost, such as when the system shuts down. This contrasts with HDD and SSD storage, which is persistent, staying on the drive until deleted. Many memory intensive programs such as Adobe Photoshop use the RAM heavily in order to make photo processing as quick as possible, but the RAM can fill up quickly.In order to make space, sections of data stored in RAM, called blocks, are moved to free space on a hard-drive available to the system. This allows more frequently accessed data to remain on the RAM, which can be read quicker. When the data that was moved to the hard-drive is needed, it's either read directly from the hard-drive, or the blocks are swapped with others consuming space in RAM. Unfortunately the hard-disc device cannot be read or written to nearly as quickly as the RAM, which presents performance issues.
By installing more RAM, the need to use swap space on the hard-drive is reduced. This means that time usually spend swapping blocks of data between RAM and drive storage is eliminated, and the slow access speeds of hard-drives does not have an effect. For most users and computer systems, a simple increase in RAM will not offer a great performance improvement for the price. That said, professionals who often use multiple resource-heavy applications at once can see a significant boost after installing more memory. Considering the profession of the user, I suggest the addition of 12 GB of Corsair Vengeance DDR3 memory to the system, and the removal of the current modules.
Storage
Although the storage capacity is often advertised by manufacturers as a selling point, the amount of space available has minimal importance. Having a greater capacity drive will not have a significant impact on performance, if one at all, by in the case of a hard-drive that is almost full, fragmentation is almost inevitable. By buying a new larger-capacity drive, and cloning the contents of the original onto it, an improvement can be felt. When talking of hard-drives and better performance, however, people are almost always suggesting the use of an SSD, or solid state drive.
Traditional hard-drives use a series of metal platters spinning a great speeds. Each platter is equipped with a metal arm holding a small read-write head. This can read data from and write data to blocks on the disc. Although this form of drive is very stable and can be completely rewritten several thousand times in it's lifespan, the speeds at which data can be read from and written to the drive are not impressive. Having gained a lot of popularity in recent years, the new alternative to HDDs – SSDs – use chip-based flash storage to keep data. This means that there are no moving parts inside the drive, which cause delay and slower access speeds. Home-use SSDs can perform up to around eight times quicker than hard-disc drives using a SATA 3 connection, and server-grade SSDs can perform up to sixty times quicker when using a PCI Express connection.
SSDs have the biggest effect on performance during system boot and the opening of applications. This is because data can be read from the disc and into RAM at a much quicker pace, and is still rarely bottlenecked by other components such as the motherboard or CPU. The use of SSDs could be greatly beneficial to a graphic designer or videographer, as loading professional suite applications can become cumbersome and time consuming when using HDDs. Although SSDs are less reliable and only available in much smaller capacities than HDDs, the designer could also store projects and raw footage/photographs on the SSDs, meaning that when working working on multiple projects at once and over several days or weeks, the data could be read and work resumed quicker each day. For these two reasons, SSDs are able to greatly improve the workflow of a user, while also providing performance improvements for gamers, for example.
Monitor
As a designer, it's likely that the user will want a large monitor, with near-perfect colour reproduction. This can be achieved with a glossy-finished, 1440p, 1600p or even 2160p (4K) monitor, particularly those using an IPS panel, a high pixel density (or PPI) and a modern, digital input connection. The user may also decide that they would like the freedom of two or three separate monitors, which can be achieved with almost all dedicated graphics cards and many laptops.
The use of a high resolution display means that the projects that the designer is working on can be seen at a great level of detail, while the workspace around it remains un-cluttered. This is important as a part of an efficient workflow, and means that the user needn't spend time trying to make the interface work well, and can instead focus on their work. Many believe that a well designed interface should go virtually unnoticed by the user, as it will be incredibly intuitive. Many laptops use displays with the dimensions 1366 × 768 or 1920 × 1080. Using a 2160p screen would offer 7.9 or 4 times as many pixels, which can accommodate a lot more work.
IPS (in-plane switching) technology is a form of display that offers much improved colour reproduction to the more traditional TN screens (twisted nematic, a form of thin-film transistor LCD). These are commonly found on mobile devices, which are exposed to much more demanding conditions, such as both daylight and complete darkness, than most computer monitors. IPS panel displays are not as popular with gamers as TN panel displays as they cannot display as high frame-rates as their predecessors, but they have become greatly popular in the design industry, thanks to their colour representation and wide viewing angles.
Using a high pixel density can also be preferable for design work. Using a higher pixel density means that text and images are significantly more clear. In some cases, the individual pixels on the screen cannot even be distinguished by the human eye, which means that test looks as good, if not better, than printed text on paper.
Many older monitors still use the VGA standard, using a D-SUB connector. Although this is acceptable for most uses, many professionals, enthusiasts and gamers demand better quality. The VGA standard uses an analogue signal, which is susceptible to interference, and whose quality can degrade over long distances. When the DVI standard was released, and the DisplayPort standard after that, digital data transfer was introduced. This means that the connection is not affected by interference, and is largely unimproved by gold plating, contrary to what is often advertised. HDMI is another form of digital display standard, which is able to carry audio as well as video. By using any form of digital connection, preferably DisplayPort, the clarity of the image on screen is much improved. The use of newer standards also means that old, less-capable standards such as VGA can be phased out quicker.